Automate Custom EC2 AMIs

If you work for an organization/company that leverages the services of a public cloud provider such as AWS, chances are there is a customized image available in your environment. Most companies today offer some sort of customized default image or images that contain baked in security tools, proxy variables, repository URL overrides, SSL certificates and so on. This customized image is usually sourced from common images provided by the public cloud provider.
Today, we’re going to look at how we can completely automate a customized image sourced from the AWS Linux2 AMI and deploy it to all accounts inside an organization, while maintaining a minimal infrastructure footprint. Code can be found in the following GitHub repository.
This article was originally published on Medium. Link to the Medium article can be found here.
Assumptions
- Accounts are under an AWS Organizations.
- All accounts require the customized AMI.
- VPC ACLs and Security Groups allow Port 22 into to the VPC (Packer)
- CI/CD has proper credentials to query AWS Services (Organizations, VPC, EC2).
- Gitlab and Gitlab Runner available.
Tools Utilized
Terraform Packer AWS SNS AWS Lambda AWS CLI Gitlab Gitlab CI Docker
Architecture
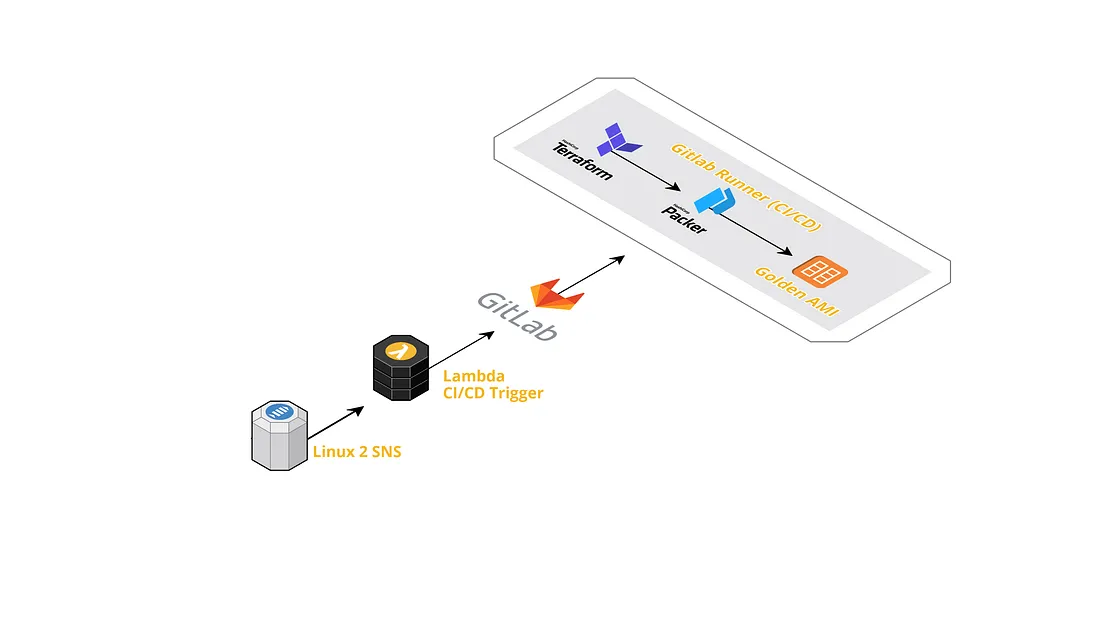
It all starts with the SNS topic provided by AWS for the Linux 2 AMI. This SNS topic is the anchor to the automation that occurs every time Amazon updates the AMI. The subscription to this SNS topic invokes a Lambda function, the function makes a REST call to a Gitlab repository that is configured with a Gitlab Runner. The REST call is what triggers the CI/CD pipeline.
The pipeline delivers a newly minted AMI that is sourced from the Linux 2 AMI but includes baked in tools and configurations per our discretion. The customized AMI is made available to all the AWS accounts.
I will break down the automation into three sections; pre-pipeline, terraform, packer.
Pre-pipeline
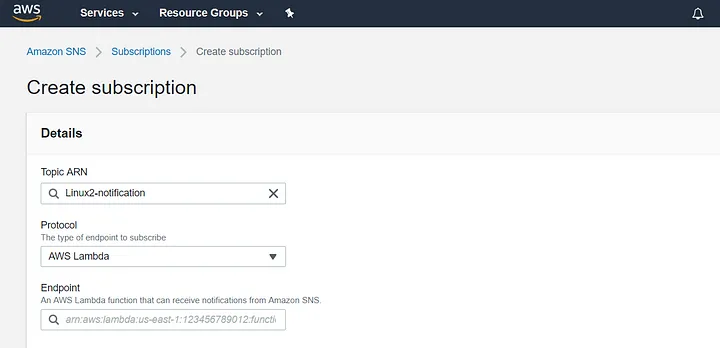
SNS
AWS provides customers with SNS topics for both of its managed AMIs (Linux & Linux 2). The automation starts by subscribing to the following ARN(see below) and assigning it a lambda function as an endpoint. When the AMI is updated, AWS publishes a message to the SNS topic and because the endpoint is a Lambda function, the function assigned will be triggered by the SNS publication.
|
|
Note: For other SNS topics of interest visit this Github repository.
Lambda
The python code (see below) is what powers the Lambda function. Its true purpose is to start a Gitlab CI runner. The Gitlab pipeline is started by using a Gitlab trigger deploy token. The deploy token can be created by going to a Gitlab repository’s settings; Settings -> CI/CD -> Pipeline triggers. Further documentation can be found here.
The deploy token is added as an encrypted environment variable which is later decrypted during the lambda invocation. The Gitlab repository’s ID is also added as an environment variable. The project ID can be found under a project’s settings; Settings -> General-> General Project.
|
|

Note: Ensure the Lambda role has proper permissions for KMS related actions.
IMPORTANT: If the customized AMI needs to be updated at a more frequent cadence, then a CloudWatch event rule can be attached to the Lambda so that the automation may be done at a more frequent cadence.
Gitlab CI YML
.gitlab-ci.yml is the file that controls the Gitlab CI Runner. This is where the pipeline is defined; images, stages, steps, scripts and so forth.
|
|
The yml file is pretty straightforward. It involves two stages. The first stage is for Terraform to create the JSON file that Packer will read. The second stage is where Packer is executed. The AWS credentials are also being set by leveraging Gitlab Secrets in the global before_script. Because this is all occurring at Gitlab.com the shared runners available at Gitlab.com are being utilized tags: [gitlab-org] .
Docker
The pipeline is using a Docker image created from the Docker file below, sourced from Hashicorp’s Terraform image. The image also includes python3, bash, the AWS CLI, and Packer. The image is created using Docker and then uploaded to the Gitlab repository’s registry so that it may be used by the CI runner. Instructions on how to complete this action can be found here.
|
|
Terraform
Terraform is what is generating the JSON file that Packer will read and use to create the AMI per our directions.
|
|
Let’s breakdown the Terraform code.
The first thing done is to create a template file that will hold a list of all the accounts in the organization data “template_file". The template file that contains all of the account IDs is then read in using data "local_file" , however this resource is dependent on null_resource.getOrganizationAccts and the reason for that is because we only want to read in the file after it has been populated.
The data "template_file" is populated by a null_resource that is leveraging the local-exec provisioner. This allows us to issue commands or to execute scripts. In this instance, a bash script is being called.
|
|
The aws-cli.sh script contains the following:
|
|
The script is simply issuing an aws cli command that queries the organization for all accounts. The output is the stripped of brackets [] and redirect into the data "template_file" . For a better understanding of how to use the AWS CLI with Terraform check out the blog article Invoking the AWS CLI with Terraform
The reason for why a script file was used rather than passing in the command is due to "" . The hardest part of this automation is getting the double quotes right in order to have a working JSON file that Packer can interpret. A lot of trial and error led down to the path of a script file rather than combating Terraform and escaping ticks inside the command attribute. Also, echo -n simplifies this challenge by removing trailing white space, including \r which the terraform function trimspace is unable to do.
The real challenge is handling JSON attributes that are expected in array syntax ["...", "..."] , and ensuring the content is passed in as a string without double quotes. More string manipulation will occur as the content is being passed into other downstream resources.
In order to create a JSON file that contains all of our required Packer configurations, a data template_file is once again being used. The neat thing about this trick is that now dynamic JSON content can be generated by using Terraform variables (see below).
The other benefit to this is that Packer can share an AMI to all the specified accounts at once rather than manually adding permissions to an AMI for each account, one at a time.
The ami-template.json is the template file that Terraform will use to create the JSON file we need for Packer. All the required parameters are using template_file variables.
|
|
If you take a closer look a the code below you can see that the accounts list is being passed in by referencing data.local_file.getOrganizationsAccts.content , you can also see some more string manipulation being done. The first " and the last " is being removed from the string as Terraform will automatically add double ticks to our string. If this step is not done then our string would look like [""15485....""] and Packer would break at run time 💥 .
|
|
A script file is being passed into the data "template_file . Use this script to customize the AMI as needed (installing programs, environment configurations, and so forth). This is the step where the AMI becomes a customized per your organization’s standards. In the demo code this script file is named amazon.sh .
|
|
In the code base there is a module named ami-latest. The module pulling down the latest version of the AWS Linux2 AMI and output the AMI id. The AMI id is what Packer will use to source the newly created AMI from.
|
|
Note: This could alternatively be done in Packer as well using source_ami_filter: [].
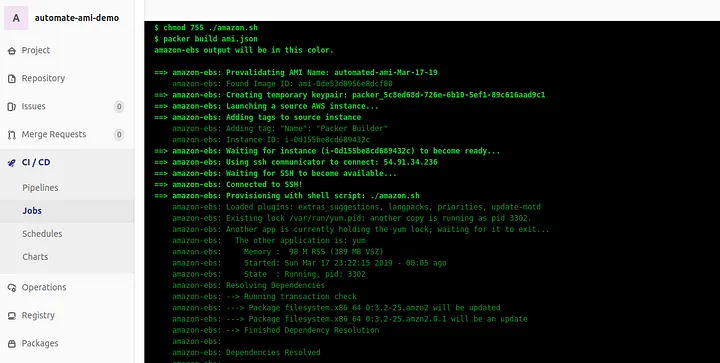
Packer
The second stage in the pipeline is where Packer is being invoked to build out an AMI. Packer is using the generated file ami.json from the previous pipeline step to create the customized AMI.
Packer operates in the following order:
- Confirm specified source AMI is available
- Verify no other AMI with same name exists
- Spinning up an EC2 instance on our behalf
- Generate a temporary key pair
- SSH into the EC2 instance
- Execute specified scripts/user_data
- Stopping the EC2 instance
- Register the AMI
- Terminate the EC2 instance
- Delete temporary key pair
Conclusion
The automation architecture has a minimal footprint and is serverless for the majority of the time. The Linux2 AMI was used in the demo code but this can be adjusted to use other AMIs. Remember, if this needs to occur at more frequent cadence to attach a CloudWatch rule to the Lambda function.
Feel free to fork the code and make adjustments as needed. Just remember, string manipulation is the trickiest part. Hopefully this solution can help you and your team from no longer manually creating AMIs and sharing them with other AWS accounts.