
How to use AWS DynamoDB locally…
 Karl Cardenas
included in posts
Karl Cardenas
included in posts
Chances are most of us have unique situations for wanting to interact with DynamoDB locally, maybe it’s to develop and test different data models, perhaps it’s to develop programmatic functions to interact with the database, perhaps you want to reduce development expenses, or perhaps you’re just doing research. Regardless of your reasons, I want to help you by showing you how to leverage DynamoDB locally. We will use the following tools.
We will walk through setting up the local environment, generating data, uploading data, interacting with the noSQL Workbench, and some neat tips to keep in mind. So with that being said, let’s dive into into it!
Note: If you get lost, simply visit https://github.com/karl-cardenas-coding/dynamodb-local-example to view the end solution. Also, feel free to fork this template project and use it as a starting point.
Setting up the environment
First thing first, ensure that you have Terraform (> v0.12.0), noSQL Workbench, and localstack ( > v0.11.3) installed and working on your system. If you need help installing these resources checkout the three links below. Due to the abundance of resources for getting started available, I will skip ahead and assume you have them installed.
(Alternative) if you don’t want to use localstack, DynamoDB offers a docker image, you may use this option as well.
Localstack
First thing first, fire up localstack. If you installed it through pip then it’s as easy as issuing the command localstack start . Or if you used the localstack docker image then it’s as simple as docker run localstack/localstack . If everything starts up correctly then you should be seeing something similar to the screenshot below.
Note: localstack has plenty of parameters to pass in during startup. We are taking the defaults which starts majority of the mocked AWS services but there are plenty of other options worth checking out.
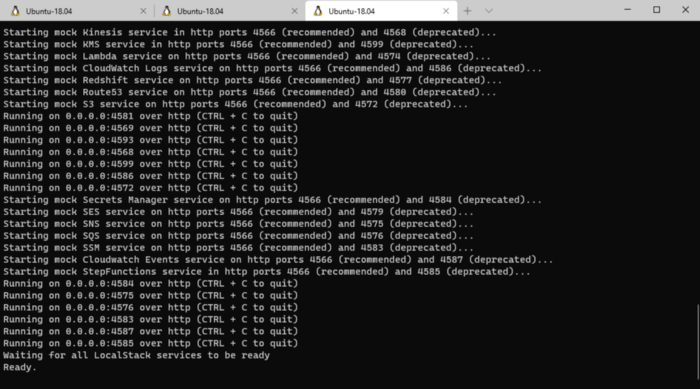
*WSL2 output through pip installation*
Terraform
Terraform is a great solution to automate the deployment of the local DynamoDB environment, along with any other AWS resources required to get the desired test environment created. In this example, we’re actually going to use Terraform to seed the database (more on that latter). However, first we need to setup Terraform to leverage localstack.
All that is needed to leverage Terraform with localstack is to modify the aws provider block.
|
|
If you review the code snippet above you will probably notice how on line 10 we are specifying a code block for endpoints. This is where we essentially point Terraform to localhost and the port that localstack is listening on, for the respective mocked AWS service. I have also added the DynomoDB docker image configuration for those of you who took that approach, just remember to ensure that the container port specified is correct.
In the example project I provided, take a peek at the main.tf file. In the example project, a customer order table is being deployed. In addition, I have a local secondary index and global secondary index.
Let’s deploy this Terraform configuration.
|
|
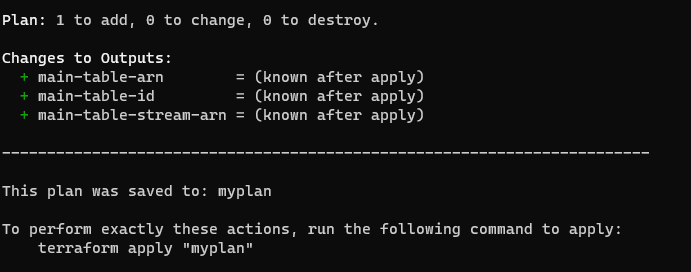
**What Terraform plan should reveal**
If you get a similar output as the picture above, go ahead and issue the command below
|
|
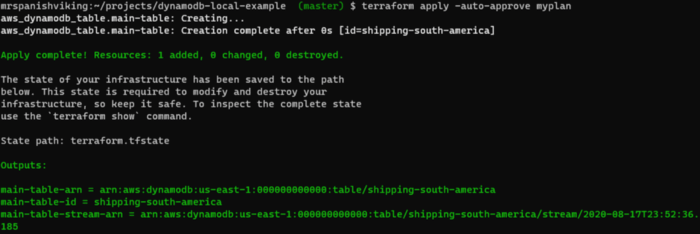
**Successful terraform apply output**
Let us validate that we actually have a table in localstack. We can leverage the AWS CLI for this. We are expecting a table by the name of shipping-south-america
|
|
If you got the following output (see below), then you did everything correctly.
The key thing to remember is when using the AWS CLI with localstack OR the DynamoDB docker image, is to leverage the --endpoint-url parameter.
|
|
So we now have a mocked DynamoDB table, great! But it’s no good without data, unless you are only planning on working on putting items into the table. So let’s add mock data.
Adding Data to DynamoDB
When it comes to generating mock data I prefer Mockaroo (free). It makes it super easy to come up with all kinds of mock data and at a high volume, plus they offer free mock API endpoints. Seriously, such a neat resource! But I digress. By leveraging Mockarro, I have generated 50 JSON objects that look similar to this:
|
|
The raw JSON content is in a file named raw-data.json. However, we have a problem. We simply cannot upload JSON objects to DynamoDB, we have to convert the JSON content to DynamoDB JSON (yes, that’s a thing).
DynamoDB expects the JSON to be in the following format.
|
|
You’re probably thinking, Ooofff. This could be tedious to do for large datasets. Currently, the AWS DynamoDB Console and AWS CLI does not offer the ability to import data from a JSON file. The alternative is using the AWS SDK.
Normally, I would recommend using a simple script that reads in the JSON file and uploads it. I have provided a Go script for those of you that want a working example of using such a script. Feel free to leverage this solution for your own need. Instructions can be found in the README. This is hands down the better approach.
However, if you feel uncomfortable using the provided Go script, or perhaps rather just work with the AWS CLI then you can use the approach I will provide below.
You can convert JSON objects to DynamoDB objects using the free tool, DynamoDB JSON Converter. You will however have to change the data format to conform to the format the AWS CLI expects, take a look at the formatted-data.json file in the static folder. The key is to remember that the table name must be the first property and that every object must be wrapped inside an Item {}. It’s easy to change regular JSON to this format with the help of the DynamoDB JSON Converter tool but it is tedious work. Be aware that using the AWS CLI limits you to 25 objects when using the batch-write-item command. That’s why the Go script provided is a better solution as it has no upload limitation.
The next step is having Terraform upload the data, either through the AWS CLI or through the Go binary. Let’s take a peek at how that is accomplished.
Note: If you are using the example project, make sure you uncomment ONLY one of the null_resources . Pick the solution you prefer but if you go with the Go script make sure to compile the binary (see README for directions).
|
|
Let’s upload the data by issuing the commands below.
|
|
Validate that you have data in the table by issuing the following command. Don’t forget to use the table name you provided Terraform.
|
|
If you see your data in the console output then you have done everything correctly and can move onto the next step of using the NoSQL WorkBench for DynamoDB 👏.
noSQL WorkBench for DynamoDB
This tool is great for interacting with DynamoDB in a development/test environment. It’s really handy when you are trying to identify the proper data model for the table. It comes with a few example data models out of the box. Use these as a learning tool when learning and/or researching what NoSQL data model to use. There are many reasons why you would want to leverage NoSQL Workbench for DynamoDB, to name a few.
- Identifying/Creating Queries
- Adding Items
- Removing Items
- Evaluate Indexes usage (Local and Secondary)
- Example code for programmatic function (Java, Python, JavaScript)
However, before we can utilize any of these neat functions we need to point NoSQL Workbench for DynamoDB to our mocked table. So let’s get started.
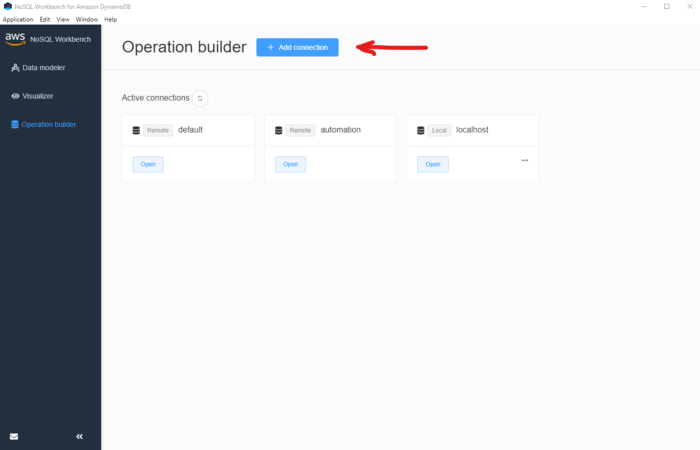
Open up noSQL and click on “Operation builder” (left-hand side navbar)
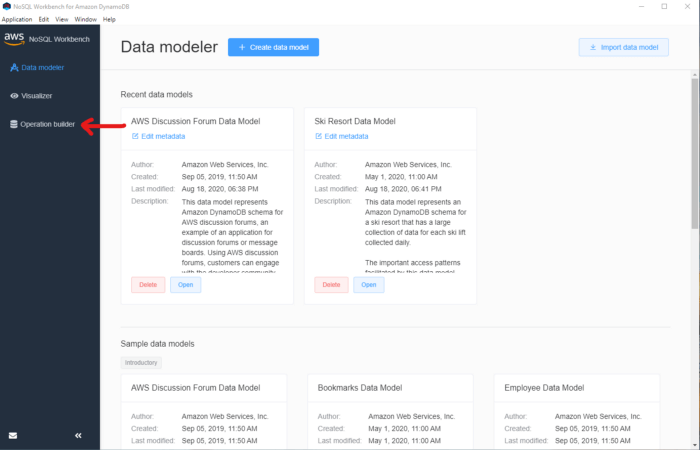
*Select Operation builder*
This will take you to yet another screen. Click on the “DynamoDB local” tab and fill out the information required. You should only have to provide a name for this connection and the local port that the mocked DynamoDB is listening on.
If you are using localstack then it will be port 4566 but if you are using a Docker image then use the container port, usually 8000 . Click on the blue button named “Connect”.
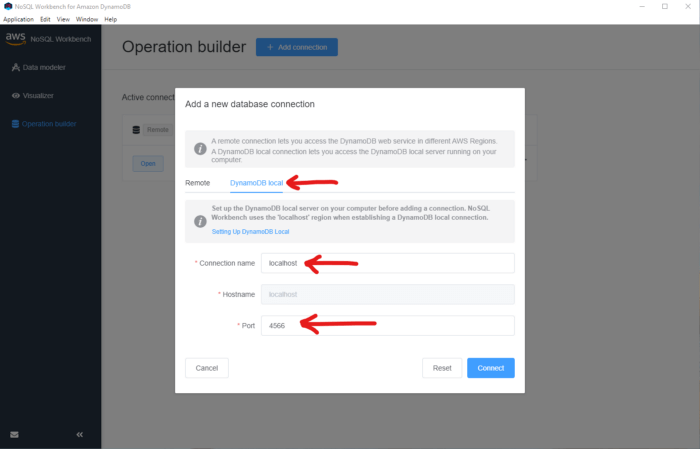
*The configuration step for setting up local usage*
After clicking on “Connect”, you should be on the screen before the configurations steps. Ensure you see your “localhost” connection and click on the “Open” button.
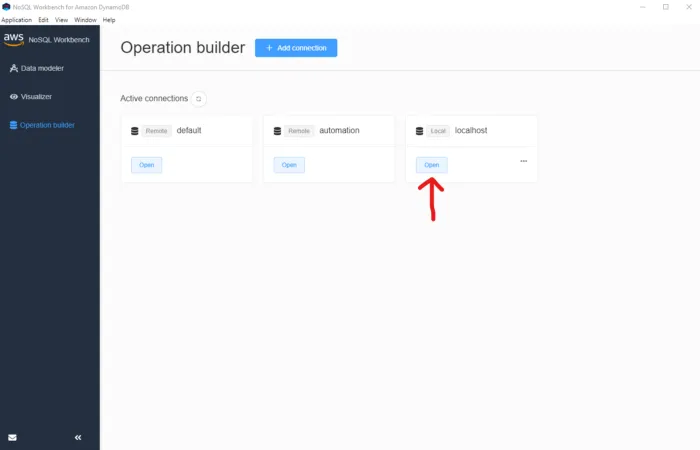
*Opening up the localhost connection*
If your local mocked environment is up and running then you should be taken to a screen that has your table information. You will have to click on your table’s name in order to see the table content (see image below).
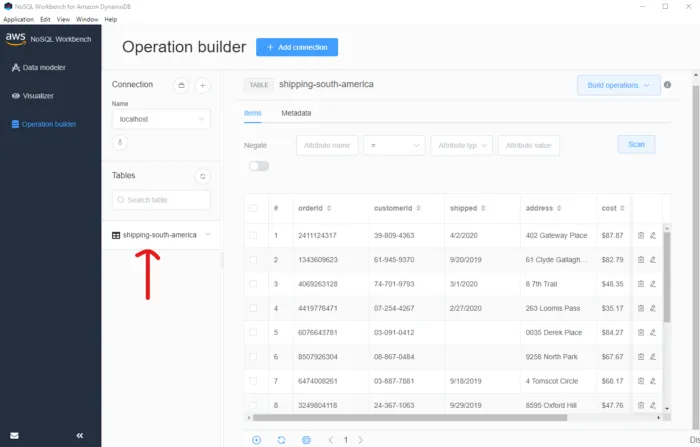
*All of our table data*
Voila! There you have all of your data available in a nice and clean user interface. A lot of the AWS Console functionality is available in this tool, such as removing an item, modifying an item, adding an item, scans, query, and more. It’s nice to have the option of conducting manual actions versus having to use the AWS CLI or being forced to leverage a programmatic function (when developing). I won’t go into too much more detail about NoSQL Workbench for DynamoDB but before I wrap up this article I do want to share with you this awesome gem that the tool provides 💎.
SDK Help
When using the AWS DynamoDB SDK, regardless of the language, it takes a bit to learn how to interact with DynamoDB. DynamoDB has its own unique quirks and opinionated interactions when using its API.
It’s for these situations where NoSQL Workbench for DynamoDB is extremely useful. Let’s say you want to create a function that queries DynamoDB with a condition check and filter. We want to know if orderID 6076643781 has been shipped.
Let’s leverage the query functionality of this tool. Click on “Build Operations” — -> “Query”.
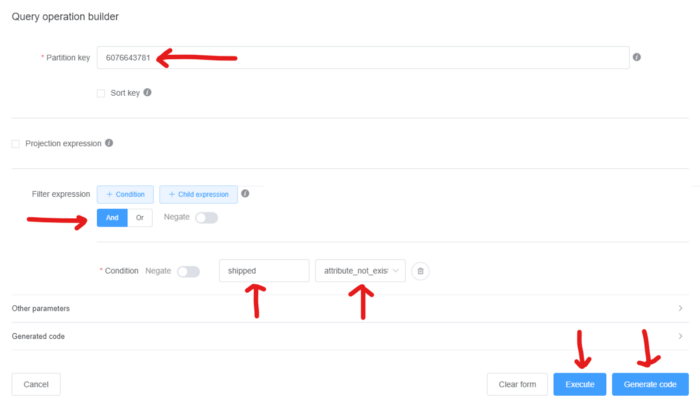
*The query populated*
In the image above I have filled out the required information to identify this information. If I click on the “Execute” button, it will take me back to the table view and present the results of the query. If there are no results then the screen will be blank and a little pop up will notify us of no results found. This is super useful when learning and identifying the access patterns for your database. It also comes in handy when deciding on what type of indexes to leverage.
You might have also noticed that in the image above that there is a “Generate code” button. Click on it! You should be seeing the generated code

Now you have the query logic available to you. All you need to do is pick the language of your choice! This is an amazing time saver but also super handy when learning how to use the DynamoDB SDK and interacting with DynamoDB’s API. This functionality works for all “Build Operations” that the tool provides.
To reset the table view, simply hit the “Scan” button.
There is more to this tool but the last trick is perhaps one of the best functionality that comes out of the box with NoSQL Workbench for DynamoDB.
Clean Up
To clean up, simply use Terraform and provide the command below.
|
|
Stop localstack (Ctrl +C) and/or the Docker container that you spun up for DynamoDB.
That’s a wrap! The three tools combined, localstack, Terraform, and NoSQL Workbench for DynamoDB make up the perfect local DynamoDB development experience. It’s pretty much all you need when interacting with DynamoDB in a local setting. You now don’t have to worry about messing up the team’s development instance or corrupting the data. You now have your very own DynamoDB table that you can use however you want to and it’s free.
Again, feel free to use my template project as a starting point, simply use the template button and get started. All I ask is that you pay it forward by helping someone else out in the future 😉
https://github.com/karl-cardenas-coding/dynamodb-local-example
Thanks for reading!